


Have you ever ever questioned if there’s a simple solution to develop mushrooms at residence – without having to purchase a brand new package every time?
To seek out out, I went to go to mushroom professional, Ivan Lucas, who runs Mushroom Field.
Ivan defined that the selection of the mushroom you develop is important to success. The simplest are the oyster mushrooms. These will develop fortunately and prolifically inside the house, in little or no house (even below your mattress!) on chopped straw, cardboard, previous cotton garments, unbleached paper – or a mixture of any of those. Espresso grounds will also be used however are tougher as a result of they simply go mouldy.
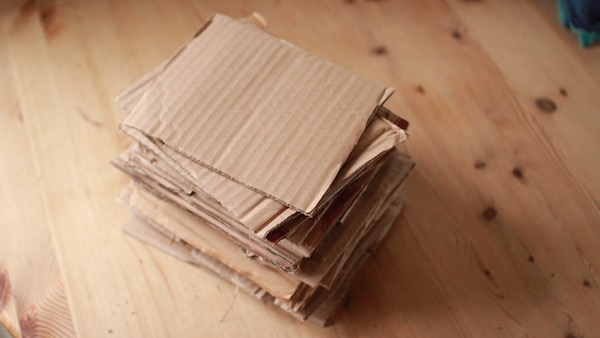
Whereas the simplest media to develop on is chopped straw, this can be troublesome for a few of you to pay money for in small portions in your metropolis (a minimum of, it’s the place I dwell). So I requested Ivan to indicate us the way to use waste card, which IS normally in plentiful provide.
This is what you’ll must develop oysters on cardboard:
- house to place them – concerning the measurement of a medium cardboard field is lots.
- daylight (whereas they’re fruiting – sufficient to learn a e-book by)
- heat (something from 10 – 250C, relying on the number of oyster mushroom)
- a water spray bottle to maintain them moist.
- a kettle.
- a provide of cardboard
- a big plastic bag or two.
- a bucket or bowl that can maintain boiling water
- mushroom spawn – you need a provider who sells the spawn by itself (with out having to purchase an entire package) – Mushroom Field within the UK is the one I take advantage of.
There are lots of forms of oyster mushrooms. Two good decisions of oysters to develop first are:
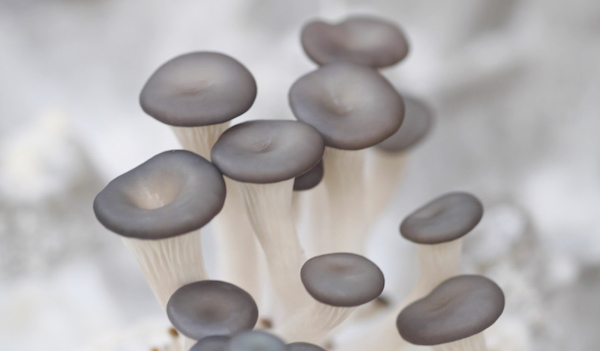
- Blue gray oysters. These are the simplest and one of many highest yielding. Additionally they develop in cooler temperatures than some – something between 10 and 20 0C (50 – 680).
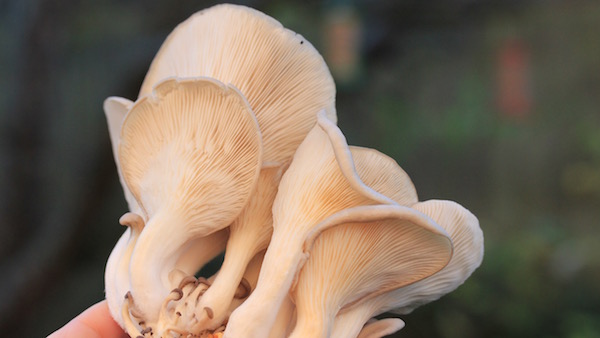
- Pink oysters (in pic above). In addition to being a surprising color, these are one of many quickest rising mushrooms, producing fruits in as little as three or 4 weeks. They’re a tropical mushroom and want a hotter temperature – one thing between 18 and 27 0C. You probably have a heat home you could possibly develop them in winter.
On this video (and summarised within the notes under), Ivan reveals you step-by-step the way to pasteurise and develop oyster mushrooms on cardboard egg trays. You should use the identical course of for rising on card, previous cotton garments or chopped up straw.
https://youtu.be/Qfk95bI-jhs
Listed here are Ivan’s step-by-step directions:
Step 1: Pasteurise the cardboard
So as to provide your oysters begin, and cut back the danger of the card turning into contaminated with mould, you will want to kill a lot of the different micro organisms which might be dwelling in your cardboard. You may obtain this by soaking it in boiling water – a easy however efficient approach referred to as pasteurisation. (Oyster mushrooms are what is named ‘main decomposers’ – because of this they’re one of many first organisms to maneuver in when a tree or plant has died. It additionally signifies that they usually are not good at competing with different moulds and micro organism – which is why pasteurisation is so vital).
- Put together your cardboard. Egg trays want no additional preparation (see video); however in case you are utilizing cardboard containers you will need to both minimize the cardboard into related sized squares (layer the mushroom spawn between the squares) or tear into strips.
 Should you minimize your cardboard up into squares, you possibly can sandwich the spawn between every layer after pasteurisation (in the identical method Ivan does with the egg trays within the video).
- Then put your cardboard in a heatproof container (a bucket, bowl or sturdy, warmth resistant plastic bag), boil the kettle, and pour scorching water over the cardboard till it’s utterly lined (for those who press the cardboard down you can see you are able to do this with much less water). Put a lid on the bucket and depart it to cool utterly – for eight hours or in a single day.
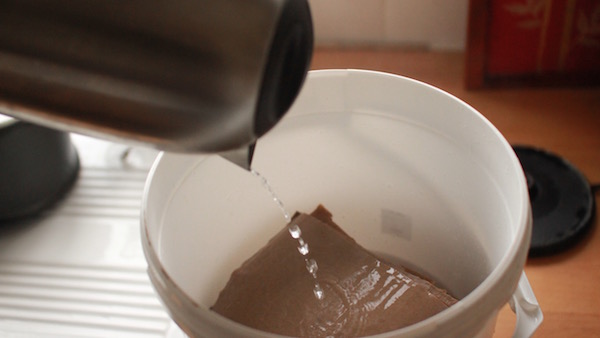 Soaking the cardboard in boiling water is significant to kill off contaminating organisms. Be sure the water is totally cool earlier than including the mushroom spawn.
Step 2: Inoculate with spawn
- As soon as utterly cool, drain as a lot of the water off as you possibly can – squeeze the cardboard to take away the surplus. Your media is now prepared for inoculation with the spawn.
- Cleanliness is vital at this stage to keep away from contaminating the cardboard once more – wash your palms with an anti-bacterial wash or cleaning soap earlier than dealing with the rising media or spawn.
- If utilizing egg trays or squares of card, pile them up in a layer, placing a number of spawn between every layer (see video).
- If utilizing cardboard strips, put the strips in a clear plastic bag and blend the spawn via them. The higher you combine them, the quicker your spawn will colonise. Then minimize eight cross hatch slits within the sides of the bag (every slit about 1 inch lengthy). That is the place the mushrooms will develop afterward.
Your mushrooms are prepared for step 3, colonisation.
Step 3: Colonisation of the cardboard
On this step the mushrooms are left in a heat place for a number of weeks to colonise the cardboard.
- Put the egg trays or bag of card strips into one other bigger plastic bag (eg a bin bag), with out holes within the backside. Shut this to exclude the contemporary air. Carbon dioxide will construct up contained in the bag and it will stimulate the mushroom to develop via the cardboard.
- Then put this bag in a heat place – it must be a minimum of 10 0C for blue gray and 180C for pink oysters, however they may colonise quicker in a hotter place like an airing cabinet.
- After a few days, open the bag simply to test that no swimming pools of water have collected on the backside (moisture is sweet, however swimming pools of water usually are not). Should you discover extra water, pour it out.
- Shut the bag up once more and put it again in a heat place for 3 – 4 weeks (pink oysters) and 4 – 6 weeks (blue-grey). They don’t want mild throughout this stage. You may simply depart them throughout this time. You may need to put a reminder in your diary or cellphone so that you don’t overlook about them utterly!
After about 4 to eight weeks (relying the species and the temperature), the cardboard ought to be totally colonised by the mushrooms. If you open the bag you will notice white mycelia (mushroom strands) all around the card. If it doesn’t look totally colonised, put it again within the bag for an additional week or two.
Step 4: Fruiting – first flush.
As soon as totally colonised
- Open the outer plastic bag in order that air can attain the egg trays or the bag containing the cardboard strips. The oxygen will stimulate the mushroom to fruit.
- Transfer it to a lightweight place – it wants mild to fruit (the rule of thumb is sufficient mild to learn by).
- Spray with water usually with a twig bottle, ideally twice a day. Keep away from spraying the mushrooms immediately. As an alternative spray the inside partitions of the outer bag (Ivan demonstrates this within the video). This may assist create a moist ambiance that the mushroom must fruit. If moisture ranges usually are not excessive sufficient, the mushroom won’t fruit or child fruits might die.
- After a number of days, you’ll start to see child ‘pin mushrooms’ of the ‘first flush’ kind. These will develop quick into full sized mushrooms in only a few days.
 Child blue-grey oyster mushrooms rising from egg trays. At this stage they’re known as “pins”; with sufficient mild and moisture they may develop to full sized mushrooms in only a few days.
- Goal to reap the mushrooms earlier than the sting of the mushrooms go wavy – however don’t fear in the event that they do as they’re nonetheless advantageous to eat (the pink mushrooms pictured on the high of the web page have a wavy edge and are simply previous their finest – however nonetheless superb to eat).
- Harvest the mushrooms by twisting the fruits off the bag – keep away from tearing them as you could injury the mycelia.
- Take pleasure in consuming them. Do not forget that the stems of oyster mushrooms could be powerful and virtually inedible, so ensure to take away these earlier than cooking.
 The color of blue gray oyster mushrooms relies on the temperature – in cooler temperature they are going to be bluer than the above. These have been grown on straw however in any other case utilizing an analogous technique.
Step 5: Fruiting – later flushes
After the primary flush,
- Hold spraying the mushrooms with moisture a couple of times a day, and preserve them in a lightweight place. After ten to fifteen days (typically a bit longer) you need to get a second flush of mushrooms. That is normally as giant and typically bigger than the primary flush.
- Proceed spraying the mushrooms and you could additionally get a 3rd, fourth and even fifth flush at two or three week intervals. These later will normally be progressively smaller.
- When the mushrooms have completed fruiting, add the spent straw to your compost heap or wormery when you’ve got one. You may even get one other flush of mushrooms.
Thanks very a lot to Ivan for sharing his recommendation and expertise. You may obtain extra details about the totally different forms of oyster mushrooms from his web site at Mushroom Field (search for the hyperlink within the high proper nook).
What’s one of the simplest ways to begin rising mushrooms?
Utilizing Ivan’s technique within the video, you possibly can develop mushrooms affordably at residence – all you will most likely want to purchase is the mushroom spawn. Please remember, although: though not troublesome, there may be some trial and error to develop them efficiently like this on cardboard. On your first try, if you’d like one thing simpler, you might go for a straw primarily based package (obtainable from Mushroom Field and plenty of different suppliers). This offers you expertise of what the mushrooms appear like on the totally different phases of development, equipping you with helpful data whenever you begin rising on different media, like cardboard.
Your flip
I’d like to find out about your oyster mushroom rising expertise within the feedback under. Have you ever tried rising them on cardboard? Any ideas for achievement to share?